Managing customer data efficiently is crucial for any business, and KinraSoft makes it easy with its user-friendly interface. In this guide, we’ll walk you through the complete process of adding a new customer in KinraSoft, including important fields for e-Invoicing compliance, tax identification, and account preferences.
Whether you’re adding a business, individual, or government entity, this step-by-step guide has you covered.
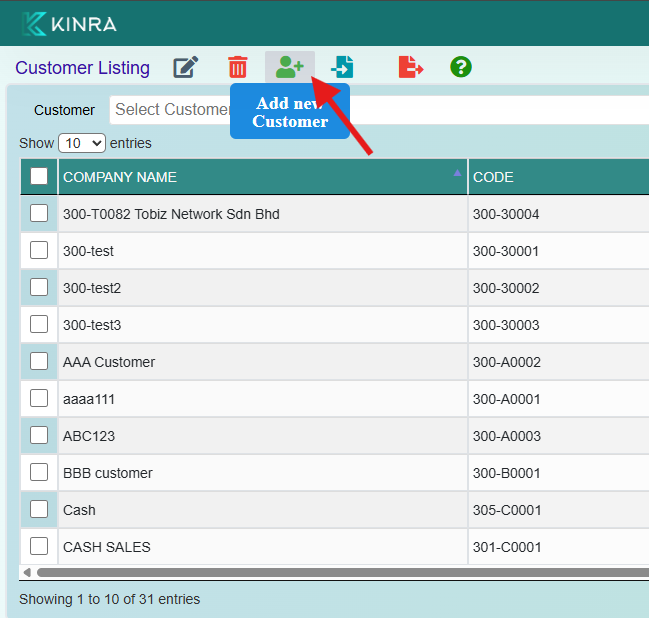
Step 1: Navigate to the Customer Maintenance Page
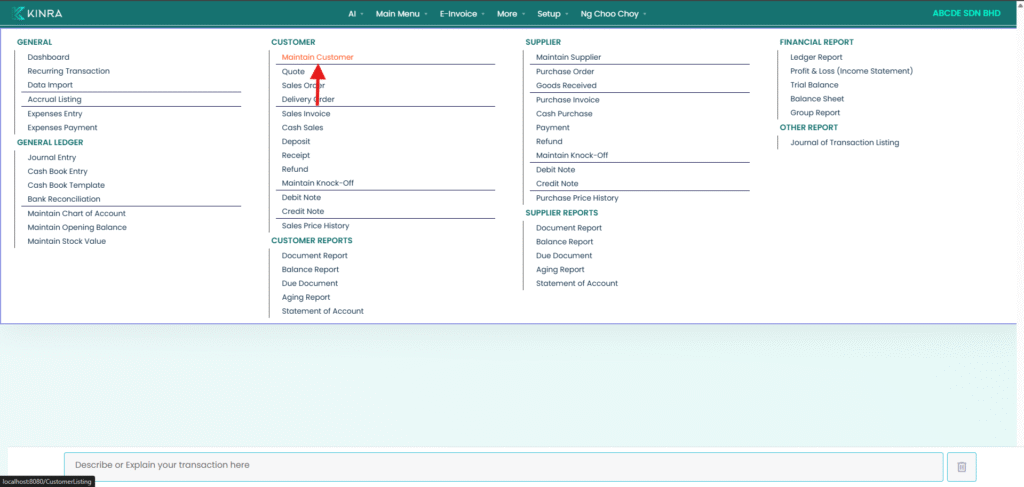
To begin:
- Go to the Main Menu
- Select Customer > Maintain Customer
- Click the “Add New Customer” icon
Step 2: Fill in Company and Registration Details

Enter the following basic details:
- Company Name
- Business Registration Number (BRN)
These fields are essential for identifying your customer in the system.
Step 3: Complete Mandatory E-Invoicing Details
To comply with Malaysia’s e-Invoicing regulations, be sure to fill in all required fields:
- Address
- Postcode
- Country
- State
- City
- Phone Number
- Any other contact or compliance information required
Step 4: Choose E-Invoice Category & Set Customer Type
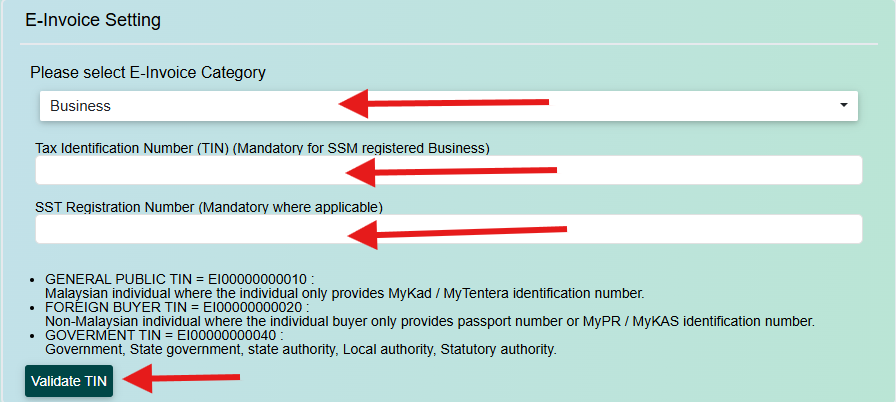
This step is crucial for e-Invoice validation. Here’s how to proceed:
✅ Select E-Invoice Category
If the customer is exempt, choose “Exempted From E-Invoice”.
✅ Specify the Customer Type & Validate Identification
🏢 Business
- Choose Business
- Enter TIN Number and SST Number
- Click Validate TIN
👤 General Public (Malaysian Individual)
- Choose General Public
- Use the Default TIN or select Manual Key In TIN
- Pick ID Type (NRIC or Army ID)
- Enter the ID Number
🌏 Foreign Supplier (Non-Malaysian Individual)
- Choose Foreign Supplier
- Use the Default TIN or enter manually
- Select ID Type (Passport, MyPR, or MyKAS)
- Enter the ID Number
🏛️ Government / Local Authority / Statutory Body
- Choose the appropriate type:
- Government
- Local Authority
- Statutory Authority
Step 5: Finalize Account Setup and Save

Now configure customer-specific financial and account settings.
💳 Credit & Payment Settings
- Enable Allow Exceed Credit Limit (if applicable)
- Turn on Auto Knock-Off for automatic payment matching
- Choose the Currency (MYR or foreign)
- Set Credit Term and Credit Limit
📄 Statements & Aging Preferences
- Under Statement, select either:
- Open Item
- Brought Forward
- Under Aging On, choose:
- Invoice Date
- Due Date
🎯 Final Details & Save
- Choose the appropriate Price Category
- Assign Area and Sales Agent
- Review all details carefully
- Click Save to complete the customer setup
Final Thoughts
Adding a customer in KinraSoft is a streamlined process that ensures your customer profiles are accurate, LHDN-compliant, and ready for seamless e-Invoicing.
By completing all steps—from registration details to TIN validation and payment preferences—you’re setting your business up for smoother operations and full compliance.
Need more help? Browse our blog for tutorials or contact the KinraSoft support team anytime!